Friday, July 15, 2011

Excel macro for uppercase conversion


Here is an excel macro for convert to uppercase the text contained in the current cell or a selected range.

Sub Uppercase()
RowsCount = Selection.Rows.Count
ColumnsCount = Selection.Columns.Count
if RowsCount = 0 or ColumnsCount=0 then
   MsgBox "ERROR: Please select a range or cell"
else

 Set Area = Selection
 For Each Cell In Area
  
' Change to uppercase.    Cell.Value = UCase(Cell.value)
 Next Cell

end if End Sub

Monday, June 27, 2011

Virtualizing a Suse Enterprise Server 9 on VMware vSphere

Recently I’ve virtualized an old  Suse Enterprise Server 9 with VMware. Here you can find some tips if you need to do something like that.

The best procedure would be adding the kernel modules for LSI Parallel controller on the physical machine and run /sbin/mkinitrd before P2V process, but if you are not allowed to modify the physical machine this is the only way I know to virtualize it.

I’ve done the P2V process using VMware’s Coldclone CD v4.1.1, first I’ve injected the physical machine’s SCSI drivers using peTool.exe

peTool.exe -i coldclone.iso -d STORAGE

Where STORAGE is a folder containing the TXTSETUP.OEM file and the drivers for my SCSI controller (LSI MegaRaid SCSI 320-2X).

Once the virtual machine is created I’ve got a boot error, the virtual machine can’t find /dev/sda1, is still trying to boot using the old MegaRaid SCSI controller:

image

In the virtualized machine I’ve chosen a LSI Logic Parallel SCSI controller:

image

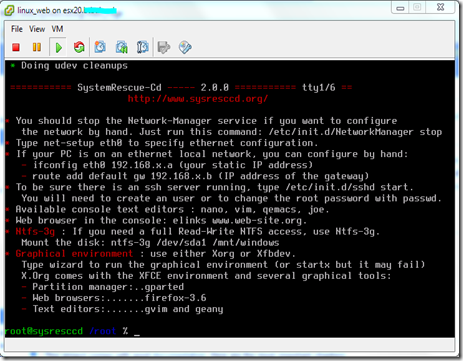
Now I’ve to create a customized initrd that loads at init level my new SCSI drivers, so I’ll boot the virtualized machine using SysRescCD
image

Now you need to mount the boot disk, so I’ll use the following command:

mount /dev/sda1 /mnt/backup

Now you must edit the file /mnt/backup/etc/sysconfig/kernel and change the INITRD_MODULES variable. This is the actual value, note the reference to the physical megaraid SCSI controller:

image

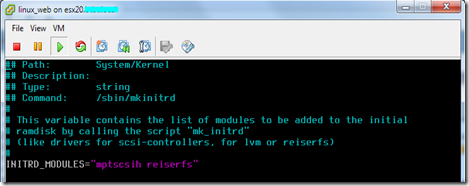
You must edit this file using vi, nano or other editor and change INITRD_MODULES like that:
image

Note that mptscsih is the driver that Suse uses for LSI Logic Parallel SCSI controller.

Now we must modify the initrd RAM boot disk image file, you can find here in page 10 Novell’s documentation for this task.

We are going to decompress the file /boot/initrd and store it in the file /tmp/ramdisk:

gunzip </mnt/backup/boot/initrd > /tmp/ramdisk

Now you must mount the file in /mnt/ramdisk:

mkdir /mnt/ramdisk
mount -o loop /tmp/ramdisk /mnt/ramdisk

Now you must delete the megaraid drivers not needed anymore:

rm -rf /mnt/ramdisk/lib/modules/2.6.5-7.201-smp/kernel/drivers/scsi/megaraid

Note that 2.6.5-7.201-smp folder depends on the system’s kernel version, it can be different in your case.

Now we are going to add the new SCSI drivers:

mkdir /mnt/ramdisk/lib/modules/2.6.5-7.201-smp/kernel/drivers/message
mkdir /mnt/ramdisk/lib/modules/2.6.5-7.201-smp/kernel/drivers/message/fusion
cp /mnt/backup/lib/modules/2.6.5-7.201-smp/kernel/drivers/message/fusion/mptbase.ko /mnt/ramdisk/lib/modules/2.6.5-7.201-smp/kernel/drivers/message/fusion
cp /mnt/backup/lib/modules/2.6.5-7.201-smp/kernel/drivers/message/fusion/mptscsih.ko /mnt/ramdisk/lib/modules/2.6.5-7.201-smp/kernel/drivers/message/fusion

You must also modify the file /mnt/backup/boot/linuxrc and locate the lines with the following text:

echo "Loading kernel/drivers/scsi/megaraid/megaraid_mm.ko"
insmod /lib/modules/2.6.5-7.201-smp/kernel/drivers/scsi/megaraid/megaraid_mm.ko

echo "Loading kernel/drivers/scsi/megaraid/megaraid_mbox.ko"
insmod /lib/modules/2.6.5-7.201-smp/kernel/drivers/scsi/megaraid/megaraid_mbox.ko

And replace them with:

echo "Loading kernel/drivers/message/fusion/mptbase.ko"
insmod /lib/modules/2.6.5-7.201-smp/kernel/drivers/message/fusion/mptbase.ko

echo "Loading kernel/drivers/message/fusion/mptscsih.ko"
insmod /lib/modules/2.6.5-7.201-smp/kernel/drivers/message/fusion/mptscsih.ko

Now we must backup up the original initrd file, note that initrd is a link to initrd-2.6.5-7.201-smp file, so you must backup that file first:

mv /mnt/backup/boot/initrd-2.6.5-7.201-smp /mnt/backup/boot/initrd-2.6.5-7.201-smp.orig

And gzip the new one with the LSI Logic Parallel SCSI drivers:

umount /mnt/ramdisk
gzip </tmp/ramdisk > /mnt/backup/boot/initrd-2.6.5-7.201-smp

Now umount /dev/sda1 device and reboot the virtual machine, remember to disconnect the SysRescCD CD and boot from hard disk.

umount /dev/sda1
init 0

On next boot you will have to reconfigure the graphical settings, but you should choose Text mode only because the VMware graphic card is not supported until you install the vmware tools package.

image

You must also delete the /etc/sysconfig/network/ifcfg-eth-id-xx:xx:xx:xx:xx:xx file for the old physical ethernet card. And then set the network settings using yast from command line.

Monday, April 4, 2011

Pasar correos desde OE en un XP a MS Outlook en un W7

Cuando intentas importar los antiguos correos de un XP que usaba Outlook Express en un equipo nuevo con Windows 7 y MS Outlook 2007 o 2010, tienes un problema porque MS Outlook sólo te importa correos desde Windows Mail, pero no te deja seleccionar un directorio de almacenamiento en el que tengas los antiguos correos de Outlook Express.

Por eso tienes que importar primero los correos a Windows Mail y luego importarlos desde MS Outlook.

Pero además Windows Mail ya no funciona en Windows 7 (en windows Vista sí que lo podías ejecutar). Para solucionar éste problema te puedes descargar de ésta página http://www.juntosblog.info/2010/12/13/instalar-windows-mail-el-susesor-de-outlook-express-en-windows-7/ un programa para poder activar Windows Mail en Windows 7, hay 2 versiones diferentes, una para x86 y otra para 64bit

La libreta de direcciones también debes pasarla primero a Windows Mail, usando el programa:
64bit: C:\Program Files\Windows Mail\Wabmig.exe
x86: C:\Program Files (x86)\Windows Mail\Wabmig.exe

Recuerda que primero debes importar tanto la libreta de direcciones como los correos a Windows Mail y luego importar desde MS Outlook.

Monday, March 28, 2011

How to stop the ‘SBCore Service’ Service” or “How to use SBS2003 as a normal server


I've found this article by Jeremy at http://www.jeremycole.com/blog/2008/06/24/how-to-stop-the-sbcore-service-service-or-how-to-use-sbs2003-as-a-normal-server/


Most of this info was found here: http://forums.speedguide.net/showthread.php?t=173731

Note: Removing this service apparently violates the license agreement for Microsoft Small Business Server. See the details here if you care.

Tools you'll need – Process Explorer from www.sysInternals.com
http://technet.microsoft.com/en-us/sysinternals/default.aspx

As you probably know, you have a service called "SBCore Service", which executes the following process: C:\WINDOWS\system32\sbscrexe.exe

If you kill it, it just restarts – and if you try and stop it you are told Access Denied.

If you fire up Process Explorer, you can select the process and Suspend it, now we can start to disable the thing.

Run regedt32.exe and find:
HKEY_LOCAL_MACHINE\SYSTEM\CurrentControlSet\Services\SBCore

Right click this, choose Permissions and give the "Administrators" group on the local machine full access (don't forget to replace permissions on child nodes).

Press F5 in regedt32 to refresh, and you'll see all of the values and data under this key.

Select the "Start" DWORD and change it from 2 to 4 – this sets the service to the "Disabled" state as far as the MMC services snap-in (and windows for that matter) is concerned.

In the original instructions, the author left the service as Disabled and just denied access to the executable:

Next, adjust the permissions on the file C:\WINDOWS\system32\sbscrexe.exe so that EVERYONE account is
denied any sort of access to this file.

Then go back to process explorer, and kill the sbscrexe.exe process, if it doesn't restart – congratulations!

Load up the services MMC snap-in and you should find that "SBS Core Services" is stopped and marked as Disabled.

I decided that I wanted the service gone completely, so (after exporting it), I just deleted the registry key while in regedt32.

After rebooting, I verified that the service was indeed gone from the list of services in MMC, and there was no sbscrexe.exe process running. Then I moved the file sbscrexe.exe from C:\windows\system32 into a tidy little folder along with my exported registry key to keep for future evaluation. Something like a disgusting little bug under glass.

Tuesday, March 15, 2011

How to install Terminal Services On Small Business Server (SBS) 2003


I've found this document that explains how to install Terminal Services in application mode on a Windows Small Business Server (SBS) 2003: http://www.bagsolutions.orconhosting.net.nz/

Before you start you have to had finished the small business server setup!!!!

This will show you how to do what M$ said you could in the pre release versions of SBS 2003 but can't in the final release. This does not crack nor get you to edit any of Microsoft's code. It just does what the install would have done. We have tested this as much as we could we cannot guarantee that it will work or be held liable for any errors, unforeseen or otherwise, that might occur.

Enjoy ;) Bob And Ge 26 Nov 2003

WARNING - People have Reported Problems with MMC after doing this. We found that it worked O.k. with only one console (window) open at a time.

Comments and Queries can be directed to BAG_Solutions@hotmail.com, but we aren't able to spend much time on this issue, so you might not get a reply.

  • Run the Following Command: (all on one line)
    %systemroot%\system32\rundll32.exe setupapi,InstallHinfSection TerminalServices.AppServer.x86 128 %systemroot%\inf\tsoc.inf

  • Reboot Computer after executing above command it will not show any sign that it has been completed
  • OPTIONAL: Reinstall Administration Tools from %systemroot%\system32\adminpak.msi - You only need to do this if you have problems with MMC. This won't fix the problem with multiple consoles not working, but can restore completely dead ones.
  • Set Permissions For Users In Local Security Policy, to allow logon through Terminal Services.
  • Turn On Tick Allow users to connect remotely to your computer in System Properties / Remote
  • Add Everyone Group To Permissions:
  • Reboot to finish installation

Wednesday, March 9, 2011

How to export/import group policies in Windows 2003


You must install Group Policy Management Console with Service Pack 1 from Microsoft download webpage: http://www.microsoft.com/downloads/en/details.aspx?FamilyID=0a6d4c24-8cbd-4b35-9272-dd3cbfc81887

Friday, February 18, 2011

PDFCreator as a Windows service

Here you can find a post that explains how to setup PDFCreator as a Windows service:
http://outputredirection.blogspot.com/p/running-pdfcreator-as-service-on-server.html

Combined with some other little tweaks it resolves the lack of printer drivers on windows 7 x64.

Wednesday, February 16, 2011

Setting Jumbo Frames in vSphere from esx console


#1. Login to the ESX host via SSH

#2. Add a vSwitch
esxcfg-vswitch -a vSwitch2

#3. Set the MTU valu for the new vSwitch
esxcfg-vswitch -m 9000 vSwitch2
#4. Add PortGroup
esxcfg-vswitch -A "iSCSI" vSwitch2

#5. Add VMKernel Int.
esxcfg-vmknic -a -i 10.100.1.11 -n 255.255.255.0 -m 9000 "iSCSI"

#6. Attach vmnics
esxcfg-vswitch -L vmnic3 vSwitch2
#esxcfg-vswitch -L vmnic8 vSwitch2

 
#7. Check if all is configured ok
esxcfg-vswitch -l #should show the vSwitch's MTU is now 9000.
esxcfg-nics -l #should show the MTU for the NICs linked to that vSwitch are now set to 9000 as well
esxcfg-vmknic -l #show VMkernel NICs and should be now set to 9000 as well.

#8. Ping SAN with a package size of 9000 to see if everything Works
vmkping -s 9000 10.100.1.15

PING 10.100.1.15 (10.100.1.15): 9000 data bytes
9008 bytes from 10.100.1.15: icmp_seq=0 ttl=64 time=0.531 ms
9008 bytes from 10.100.1.15: icmp_seq=1 ttl=64 time=0.452 ms
9008 bytes from 10.100.1.15: icmp_seq=2 ttl=64 time=0.451 ms

Does Open-E support Jumbo Frames?


Here you can find how to enable jumbo frames on Open-e appliances: http://kb.open-e.com/Does-Open-E-support-Jumbo-Frames_28.html
Open-E supports the use of Jumbo Frames.

Use Jumbo Frames to improve performance by sending fewer frames across the network, saving CPU time and consuming less bandwidth.  The standard recommendation for the size is 9000. 

The stipulation to using Jumbo Frames is that your network hardware, which includes Ethernet cards, switches, and routers, all need to support Jumbo Frames.  Check the specs on your Ethernet card to make sure Jumbo Frames are supported.  An example of one that does support them would be the Intel Pro/1000 CT.  So then you need to check the manuals on your switches and routers to make sure they also support Jumbo Frames, or check their websites with your model.  You'll need to know what you need to do to set your switches and routers to use Jumbo Frames.  Once your hardware has been verified, then it's just a matter of setting Jumbo Frames in the Console Tools of your Open-E server.

Go to the Hardware Tools
Ctl - Alt - W

Select Tuning Options
Select Jumbo Frames Config

Select the interface you want to set and set the number to 9000.

Wednesday, January 19, 2011

Sending Mails from command line in DOS

Here you cand find a free tool for sending mails from a DOS command line: http://www.smtpinfo.com/index.php

SMTP Mailer
This product makes it extremely simple to send an email from a command line. You can specify the sender and multiple recipients including CC and BCC. It also supports multiple attachemnts and server authentication. Some options only work on the purchased edition (not free).

Apple iPad VPN Connection to SonicWALL Firewall


Here is a document from SonicWall that explains how to connect an iPad/iPhone/iPod Touch to a SonicWall firewall using L2TP over IPSEC and using XAUTH.
http://www.sonicwall-sales.com/tech_info/apple-ipad-vpn-connection-to-sonicwall-firewall.html

Tuesday, January 18, 2011

Connecting to a W2008 shared folder from W2000 or XP clients


Recently I've tried to connect to a W2008 shared folder from a W2000 server without success, however I've found this information at http://www.petri.co.il/how-to-disable-smb-2-on-windows-vista-or-server-2008.htm and now it's working fine. This applies to windows XP clients too.

How to Disable SMB 2.0 on Windows Vista/2008

Server Message Blocks Protocol (SMB) is the file sharing protocol used by default on Windows-based computers. SMB 1.0 was designed for early Windows network operating systems such as Microsoft LAN Manager and Windows for Workgroups, but until Windows Server 2008 and Vista, all Microsoft-based operating systems continued to use it more or less in its original format.
SMB 2.0 was introduced in Windows Vista and Windows Server 2008. SMB 2.0 is designed for the needs of the next generation of file servers. Windows Server 2008 and Windows Vista support both SMB 1.0 and SMB 2.0 in order to preserve backward compatibility.
Some of the enhancements in SMB 2.0, include:
  • Sending multiple SMB commands in the same packet which reduces the number of packets sent between a client and server
  • Larger buffer sizes
  • Increased scalability, including an increase in the number of concurrent open file handles on the server and the number of shares that a server can share out
  • Support for Durable Handles that can withstand short network problems
  • Support of Symbolic Links
Testing done with copying large files between Windows Vista and Windows Server 2008, and then Vista to Windows 2003, have shown that by using SMB 2.0 the file copying was, in average, 2 times faster than with older operating systems.
However, while SMB 2.0 seems to do a good job if BOTH client and server OSs support it, in some cases it will slow things down. The reason for this is that the version of SMB used for file sharing is determined during the SMB session negotiation. If both the client and server support SMB 2.0, then SMB 2.0 is selected during the initial negotiation. However, if they don't both support it, SMB 1.0 will be used to in order to preserve backwards compatibility.
The SMB protocol version to be used for file operations is decided during the negotiation phase. During the negotiation phase, a Windows Vista client advertises to the server that it can understand the new SMB 2.0 protocol. If the server (Windows Server 2008 or otherwise) understands SMB 2.0, then SMB 2.0 is chosen for subsequent communication. Otherwise the client and server use SMB 1.0.
When using the terms "client" and "server" in case of file and print sharing, it does not necessarily mean that a client-type OS such as Vista "always" connects to a server-type Os such as Windows Server 2008. Sometimes, a Vista computer will connect to another Vista computer, and in that case, the computer that is "serving" the shares is considered to be the "server".
Here's how SMB is used when related to SMB versions:
  • When a Windows Server 2008/Vista "client" connects to a Windows Server 2008/Vista "server", SMB 2.0 is used.
  • When a Windows Server 2008/Vista "client" connects to a Windows 2000/XP/2003 "server", SMB 1.0 is used.
  • When a Windows 2000/XP/2003 "client" connects to a Windows Server 2008/Vista "server", SMB 1.0 is used.
  • When a Windows 2000/XP/2003 "client" connects to a Windows 2000/XP/2003 "server", SMB 1.0 is used.
So, for troubleshooting purposes, mostly in an environment that has mixes operating systems, you might want to consider disabling SMB 2.0. So you need to do on both the "client" and the "server" operating systems. To disable SMB 2.0 for Windows Vista or Windows Server 2008 systems that are the "client" systems run the following commands:
sc config lanmanworkstation depend= bowser/mrxsmb10/nsi
sc config mrxsmb20 start= disabled
Note there's an extra " " (space) after the "=" sign.
To enable back SMB 2.0 for Windows Vista or Windows Server 2008 systems that are the "client" systems run the following commands:
sc config lanmanworkstation depend= bowser/mrxsmb10/mrxsmb20/nsi
sc config mrxsmb20 start= auto
Again, note there's an extra " " (space) after the "=" sign.
In order to disable SMB 2.0 on the server-side computer, follow these steps:
Warning!
This document contains instructions for editing the registry. If you make any error while editing the registry, you can potentially cause Windows to fail or be unable to boot, requiring you to reinstall Windows. Edit the registry at your own risk. Always back up the registry before making any changes. If you do not feel comfortable editing the registry, please do not attempt these instructions. Instead, seek the help of a trained computer specialist.
  1. Run "regedit" on Windows Server 2008 based computer.
  2. Expand and locate the sub tree as follows.
    HKLM\System\CurrentControlSet\Services\LanmanServer\Parameters
  3. Add a new REG_DWORD key with the name of "Smb2" (without quotation mark)
    Value name: Smb2
    Value type: REG_DWORD
    0 = disabled
    1 = enabled
  4. Set the value to 0 to disable SMB 2.0, or set it to 1 to re-enable SMB 2.0.
  5. Reboot the server.

Thursday, December 2, 2010

Fix Missing eth0 When Cloning Ubuntu VMware Virtual Machines

I've found this site: http://www.orzeszek.org/blog/2010/07/25/fix-missing-eth0-when-cloning-ubuntu-vmware-virtual-machines/ that explains how to resolve this issue:

Fix Missing eth0 When Cloning Ubuntu VMware Virtual Machines
by Chris on 25 July 2010

I ran into an annoyance trying to clone some Ubuntu LAMP virtual machines that I was using for website development. Every time I cloned the virtual machine, eth0 would go missing, and ifconfig would show only the loopback device, lo.

It turns out that when you clone a VMware virtual machine, the cloned virtual machine’s network interface gets a new MAC address (which, of course, it must to work on the same LAN). But Ubuntu, and many other Linux distributions, cache the old MAC address in a configuration file.

In Ubuntu, the file is /etc/udev/rules.d/70-persistent-net.rules. After cloning, it will contain a reference to the old network interface as eth0.

The easiest way to fix this problem is to simply delete the file. Ubuntu will regenerate it properly the next time it boots up.

sudo rm /etc/udev/rules.d/70-persistent-net.rules

After deleting the file, you need to reboot. After rebooting, ifconfig should show eth0 and everything should just work.

If you’re feeling less adventurous, you can rename the file to *.old so that you can restore it if something doesn’t work:

sudo mv /etc/udev/rule.d/70-persistent-net.rules /etc/udev/rule.d/70-persistent-net.rules.old

You can also edit the file to remove the old reference to eth0, and rename the new eth1 reference to eth0. But deleting the file and rebooting seems more convenient.

The relevant filename is slightly different in other Linux distributions. For example, in Debian, the filename is /etc/udev/rules.d/z25_persistent-net.rules.

P.D.: (03-08-2011) - In Suse 9 you must delete the file /etc/sysconfig/network/ifcfg-eth-id-xx:xx:xx:xx:xx:xx where xx:xx:xx:xx:xx:xx is the old MAC address.

Sunday, November 21, 2010

How can my bash script output Unicode?

Finally I found how to print Unicode characters from a bash script: http://forums.debian.net/viewtopic.php?f=10&t=45394

Here is the code from 'hedgie' that works for me:

for dec in {9472..9599} ; do
    hex=`echo "ibase=10; obase=16; $dec" | bc`
    /usr/bin/printf \\u$hex
done

Tuesday, November 16, 2010

VMware ESX 3 – use lwp-download to grab files

If you need to download an iso file from a ESX 3.x console, you can use the command lwp-download.

First http port must be opened at firewall level:
esxcfg-firewall -o 80,tcp,out,http

Then you can get a file with the command:
lwp-download <url> [<localfilename>]

And finally you should close http port at firewall level:
esxcfg-firewall -c 80,tcp,out,http

VMware ESX 4 – use cURL to grab files

I've found this information by Eric Gray at http://www.vcritical.com/2009/05/vmware-esx-4-use-curl-to-grab-files/

I need to quickly download an ISO image to my new VMware ESX 4 box and discovered that the cURL utility is now included — pretty handy.

If you have not used cURL, it is similar to wget. However, with no parameters cURL will spew the download to standard out — definitely not what you want in the case of an ISO image. Therefore, the -O option — capital O — can be used to save the downloaded file, preserving the filename. If you happen to be behind a proxy server, don’t forget to set the http_proxy environment variable — standard Linux procedure.
[root@cl-168 Storage1]# export http_proxy=http://proxy:3128
[root@cl-168 Storage1]# curl -O http://mirros.easynews.com/linux/ubuntu-releases/hardy/ubuntu-8.04.2-server-amd64.iso
Also you can connect using ftp protocol as follows:

curl -O ftp://myftpsite.com/filename --user myname:mypassword 

Friday, November 5, 2010

Random times in a batch file

You can use random times in a batch file using something like that:

echo randomize >C:\TMP\random.vbs
echo wscript.sleep Int(Rnd * 100000) >>C:\TMP\random.vbs
cscript C:\TMP\random.vbs
dir

Here is a more elaborated example (only for the vbs script):

TopWait=8       'Max. time to wait in hours
randomize
myrand = rnd()
Wait=Int(myrand * 3600 * TopWait)  'Time to wait in seconds

Hours=Wait \ 3600
Minutes=(Wait - (Hours*3600)) \ 60
Seconds=Wait - (Hours*3600) - (Minutes*60)

WScript.Echo "Waiting: " & Wait & " seconds => " & Hours & ":" & Minutes & ":" & Seconds
wscript.sleep Wait * 1000    'Must be in miliseconds
WScript.Echo "Done: " & Wait & " seconds sleeping"

REFERENCES

WScript.Sleep
Suspend the execution of the current script for the specified number of milliseconds.

Syntax
WScript.Sleep lngTime

Arguments:
lngTime is the delay in milliseconds

Example
WScript.Sleep(5000)
WScript.Echo("5 seconds have passed.")

Rnd
Return a random number

Syntax
Rnd[(seed)]

Key
seed A seed value of 0 will return the most recent random number
A seed value > 0 will return the next random number(default)
A seed value < 0 will return the same number

Example
myrand = rnd()
WScript.Echo myrand

Thursday, November 4, 2010

Unattended access to Netscreen devices from vb script


I've found this post at experts-exchange: http://www.experts-exchange.com/Software/Internet_Email/File_Sharing/SSH_Telnet/Q_22920318.html

Here is a VBScript that should do what you are looking for. Just remember your credentials are in plain text in the script, set your permissions accordiningly:

set WshShell = WScript.CreateObject("WScript.Shell")

WshShell.Run "C:\putty HOSTNAME -l LOGIN -pw PASSWORD"      ' put putty in C:\
WScript.Sleep 2000
WshShell.AppActivate "HOSTNAME - PuTTY"      'insert correct hostname
WshShell.SendKeys "command"             'insert dns refresh command
WScript.Sleep 100
WshShell.SendKeys "{ENTER}"
WScript.Sleep 1000
WshShell.SendKeys "exit"
WScript.Sleep 100
WshShell.SendKeys "{ENTER}"
You will need to put putty in you C:\ directory or give it an absolute path

Good Luck

Darkstriker69

Google Public DNS

Google has two free DNS servers at 8.8.8.8 and 8.8.4.4 IPs.
http://code.google.com/intl/es-ES/speed/public-dns/